|
Example of Play
First Edition
This is a play example of the first two turns of War of the Ring between David Morse (Mr. Weasely) and Kristofer Bengtsson (Veldrin).
The additional rules from the expansion don't alter the experience or the rules in great detail so this example of play should still provide those of you who are initially interested in the First Edition main game with an overview of how the game is played. For easy recognition all things associated with the Twilight of the Third Age expansion are written in italics.
Initial setup
The board is setup and sides are chosen, Kristofer plays the Free Peoples while David takes on the role of the Dark Lord Sauron.
Turn 1
Event phase:
Kristofer draws "Cirdan's Ships" and "Wizard's Staff" while David draws "The Ringwraiths are Abroad" and "Deep Trenches and Great Engines."
Fellowship phase:
 Since Gandalf the Grey begins the game as Guide of the Fellowship Kristofer decides to keep things as they are within the Fellowship.
Hunt Allocation phase:
David decides to put one Eye in the Hunt Box.
Action Roll phase:
Kristofer rolls 1 Will of the West, 1 Character, and 2 Palantir Action die results.
David rolls 1 Muster, 1 Army, 1 Army/Muster, 1 Character, and 2 Palantir Action die results.
Action Resolution phase:
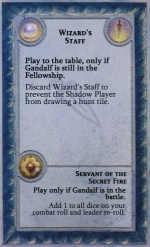
· Kristofer uses a Palantir Action die result to play "Wizard's Staff" on the table. He now draws a Character Event Card since Gandalf, as Guide, has an ability that allows him to do so when he plays a Palantir Action die result to play a Character Event Card. The card Kristofer draws is "Elven Cloaks."
· David uses a Palantir Action die result to draw an Event Card, he gets "The Shadow is Moving" and adds it to his hand.
 · Kristofer uses a Palantir Action die result to play "Elven Cloaks." He takes the Free Peoples Special Hunt Tile "Elven Cloaks" and puts it aside to remember that it shall be added to the Hunt Pool once the Fellowship enters Mordor. Once again he draws a Character Event Card due to Gandalf's Guide ability.
· David decides to use his Muster Action die result to move the Political marker of Isengard to the "At War" box on the Political Track. Isengard can now muster troops and, more importantly, Saruman can enter the game.
· Kristofer now thinks that it is time to move the Fellowship. He uses a Character Action die result, and advances the Fellowship Progress Marker one step on the Progress Track. Since David has 1 Eye die in the Hunt Box he rolls 1 die to try and find the Fellowship as they move. He rolls a 2 and the Fellowship is safe. Now that the Hunt for the Ring has been resolved the Action die used to move the Fellowship is added to the Hunt box as a reminder that next time the Fellowship moves this turn it will be slightly easier for the Shadow to make a successful Hunt roll.
 · David now brings Saruman into the game, and with him an extra Action die. This is done using an Army/Muster Action die result (used as a Muster).
· Kristofer passes. This is something a player can do when he has fewer Action dice left to use than the opponent.
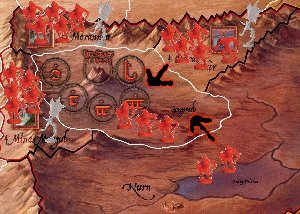
· David uses an Army Action die result to move two armies. He moves all army units and the Nazgűl in Barad-dúr as well as the two Orc units in Nurn into the Gorgoroth Region.
· Kristofer passes again.
· David now uses a Character Action die result to move the Troll, 4 orcs, and the Nazgűl in Gorgoroth to Minas Morgul. This can be done with a Character Action die result since a Nazgűl is leading the army.
· Kristofer can no longer pass and decides to use his Will of the West Action die result to move the Fellowship (the Fellowship Progress Marker is advanced one step on the Progress Track). David rolls his die for the Hunt, this time succeeding on 5 and 6 since this is the second time the Fellowship is moving this turn. Unfortunately for him he rolls a 3. As the Hunt for the Ring has been resolved the Action die used to move the Fellowship is added to the Hunt box as a reminder that next time the Fellowship moves this turn it will be slightly easier for the Shadow to make a successful Hunt roll.
· David uses his last Action die (A Palantir) to draw a Strategy Event Card, he gets "The Corsairs are Upon Us!"
Victory Check phase:
Neither side is even close to fulfilling any of their Victory Conditions so a new turn begins.
Commentary:
On turn one Gandalf makes excellent use of his Guide ability, bringing out “Wizard's Staff” and getting a replacement card. This is the best turn 1 Character Event Card for precisely that reason. The replacement is a Special Hunt Tile, which he is ALSO able to get into play this turn. The replacement to that is in turn a Companion separator, which is great to have too, since it lets you separate Companions from the Fellowship on a Palantir Action die results.
Additionally, the Fellowship moves twice without incident. The Free Peoples are off to a smashing start!
The Shadow is not so happy, since he got no great Muster cards, even after drawing three Strategy Event Cards. But he did get two Muster die results, and so is able to bring out Saruman and get that important extra Action die for turn two.
The Free Peoples’ Strategy Event Cards are also fairly worthless. “Cirdan's Ships” is very useless early, since the Elven Nation must be “At War.” And” Help Unlooked For,” though a marquis card for the Free Peoples, is really something you want to draw when the Shadow is bogging down in the south, not something you want to hold all game.
|
Turn 2
Event phase:
Kristofer draws "There and Back Again" and "Help Unlooked For" while David draws "The Lidless Eye" and "Shadows on the Misty Mountains."
Fellowship phase:
Kristofer keeps the Fellowship as it is and decides not to Declare their position.
Hunt Allocation phase:
David, again, decides to put one Eye in the Hunt Box.
Action Roll phase:
Kristofer rolls 1 Will of the West, and 3 Character die results.
David rolls 1 Muster, 1 Army, 1 Army/Muster, 3 Character, and 1 Palantir Action die results.
Action Resolution phase:
· Kristofer immidiately uses a Character die to move the Fellowship. David rolls a 6 and successfully Hunts the Fellowship. Kristofer quickly decides to use and discard "Wizard's Staff" which prevents David from drawing the Hunt tile. Now that the Hunt for the Ring has been resolved the Action die used to move the Fellowship is added to the Hunt box as a reminder that next time the Fellowship moves this turn it will be slightly easier for the Shadow to make a successful Hunt roll.
· David uses a Muster die to muster the Balrog and a Troll in Moria. Mustering the Balrog advances the North, the Eleven, and the Dwarven Nations one step on the Political Track.
· Kristofer uses a second Character die to move the Fellowship again. This time David's Hunt roll succeeds on 5 and 6 but he rolls a 3. As the Hunt for the Ring has been resolved the Action die used to move the Fellowship is added to the Hunt box as a reminder that next time the Fellowship moves this turn it will be slightly easier for the Shadow to make a successful Hunt roll.
· David uses an Army/Muster die as a Muster result to use Saruman's ability to muster 1 Isengard Regular in all of the three Settlements in Isengard.
· Fearing an attack on Rohan Kristofer uses his Will of the West to advance the Rohan Nation one step on the Political Track.
 · David uses a Character die to attack the Fords of Isen with his army in Orthanc.
The Battle at the Fords of Isen:
· David secretly chooses a card to play as a Combat Effect and tells Kristofer of his intention to do so.
· Kristofer examines his cards and comes to the conclusion that he has no Combat Effect worth playing.
· David reveals the Combat Effect he chose; it is "Swarm of Bats." Since Kristofer didn't play any card "Swarm of Bats" will give David +1 on his Leader re-roll.
· Since David has a Combat Strength greater than five he will roll five Combat Dice. He will score hits on 6s only since he is attacking a Fortification, which protects the defenders for the first round of combat.
· He rolls 1, 2, 4, 4, and 6, scoring 1 hit. He then re-rolls two dice (Saruman has a Leadership of 1 and the Isengard Elite functions as a Leader when Saruman is in play), getting 3 and 5. The 5 scores a hit due to the Combat Effect David played at the beginning of the Combat Round. A total of 2 hits.
· Kristofer now rolls two dice since he has two Regulars in the Fords of Isen. He will hit on the normal target numbers of 5 and 6. The result is a 3 and a 4. Fortunately for Kristofer he has a Leader in the Region as well and gets to re-roll one die. He rolls a 5, scoring 1 hit.
· Since David scored 2 hits Kristofer removes the two Rohan Regulars from the game, permanently. He also removes the Leader since Leaders are eliminated if the Army they are with is destroyed in combat.
· David removes 1 Isengard Regular since Kristofer scored 1 hit. But differently from the Free Peoples army units and Leaders the Shadow units and Nazgűl are not removed permanently, they are returned to the Reinforcement pool and can be mustered by the Shadow later in the game.
· Finally David decides to advance with all of his units (except Saruman, who cannot leave the Orthanc Region) into the newly captured Region.
|
· The attack on the Fords of Isen Activates and Advances the Rohan Nation so Kristofer flips the Rohan Nation Icon on the Political Track to its Activated side and advances it one step closer to the "At War" step.
· Kristofer passes.
· David uses a Character die to attack Helm's Deep. This moves the Rohan Nation into the "At War" box on the Political Track. Since Helm's Deep is a Stronghold Kristofer decides to retreat his lone army unit into the Stronghold (this is done by moving the defending army into the Stronghold Box and the attacking army advances into the Region).
· The battle in Rohan is going badly so Kristofer decides to use his last Action die and an Elven Ring (the Elven Ring turns the Action die into any result except a Will of the West) and musters a Rohan Elite unit in Edoras. The Elven Ring is then handed to David who now can use it.
· Pressing the attack David uses a Character die to attack the Stronghold of Helm's Deep.
The Siege of Helm's Deep:
· Since attacks made against a Stronghold only hits on the roll of a 6 and the attacker must downgrade an Elite unit to Regular status to keep the combat going for more than one round David needs a boost from a Combat Effect to quickly finish of Kristofer's lone Regular unit. He secretly chooses a card to play as a Combat Effect and tells Kristofer of his intention to do so.
· Kristofer once again comes to the conclusion that he has no Combat Effect worth playing.
· David reveals "Deadly Strife" which will add +2 to both sides' Combat roll and Leader re-roll.
· David rolls 3, 3, 5, 6, and 6 which is more than enough to destroy Kristofer's lone Regular.
· Kristofer rolls a 4, which kills one of the Isengard Regulars thank to the "Deadly Strife" Combat Effect.
· David puts a Shadow Control Marker on Helm's Deep as he collects his first 2 Victory Points.
|
· As Kristofer has no more Action dice left to use David goes again and uses an Army die to move two armies. He moves the army that captured Helm's Deep to West Emnet. As he does so he also puts a Shadow Control Marker on the Region as it contains a Rohan Town. He then proceeds to move the five Sauron Regulars in Gorgoroth to Morannon.
· As the last action of the turn David uses his Palantir die to play the "Shadows on the Misty mountains" Event Card to muster 2 Sauron Elites and a Nazgűl in Moria.
Victory Check phase:
Both sides are still far from fulfilling any of their Victory Conditions so a new turn begins.
Commentary:
On turn two, the Fellowship is primed to run with four Action dice capable of moving it, and only one Eye to slow them, AND “Wizard's Staff!”
The Shadow brings out the Balrog, thus moving all the northern nations closer to war (increasing the value of “Cirdan's Ships” and “Help Unlooked For” for the Free Peoples), but also increasing the risk for the Fellowship should they try to go through Moria, and giving the Shadow its ninth Action die for turn three. Is it the right decision? Difficult to say.
Kristofer spends his Will of the West to muster Rohan down the Political Track. At this point the Free Peoples knows Sauron is not going to give them an easy Galadriel, and so is trying to defend from an attack on turn three. Unfortunately, the hour is later than Théoden thinks, and Isengard comes storming over the Fords of Isen with an imperfect early army, but its more than enough to put away the token forces guarding Helm's Deep. Kristofer decides to spend a precious Elven ring to convert a precious Character die to a Muster in Edoras. Perhaps he should have saved the Character and Will of the West dice for later in the turn, allowing him to skip the redundant Political action, and move the Fellowship an additional time. Or perhaps he should have written off Rohan completely and moved the Fellowship four times that turn - though if you keep looking, you'll see that the Edoras army soon becomes the major problem for the Shadow. So in hindsight it was interesting.
Perhaps Gandalf was keen to play the two Character Event Cards he was still holding: “Phial of Galadriel” and “There and Back Again. “
At the end of turn two, the players have largely passed each other in the night. The Fellowship is off to an excellent start. Sauron has two Victory Points, but already has a worry in the Edoras army. He has also made strides by marching out Mordor, and building a strong army of Trolls in Moria. It looks to be an interesting game. Keep viewing the replay to find out the answers to the questions:
· What happens to Rohan?
· What becomes of Gandalf's plans for the Fellowship?
· Who will go “There and Back Again” and where?
· Will Galadriel make an appearance, and how soon will the Free Peoples get its fifth Action die?
· Mordor is marching. Will the Fellowship be able to send aid to the city of Minas Tirith in time?
|
|


|